


When developing your templates and email deliveries, there may be instances where you want to embed static or dynamic images into your content. Images can be photos, logos, signatures, charts, barcodes, etc. Extensions supported are: jpg, jpeg, png, and gif.
- Static images are images that remain the same regardless of your incoming data. They don’t change. An example of this may be your logo, present on every invoice you’re generating using DocuMerge. Or it might be an image of your signature, at the bottom of every contract.
- Dynamic images are images that will alter based on your incoming data. An example of this may be barcodes that update based on your products’ unique identifier IDs. Or a QR code that links to different product URLs. Or you might be swapping signature images based on the user generating the document.
ADD STATIC IMAGES WITH DOCUMENT BUILDER
USING THE CODE EDITOR
When using the Code Editor, simply include your img tag, source, and dimensions where you wish to include the image within your HTML code. Then save. IE:<img src="http://www.yourdomain.com/images/my-logo.jpg" width="300" height"300" />
USING THE VISUAL (WYSIWYG) EDITOR
- Load Your Template. Open the Document Builder template from your documents list, or find the email delivery of a document or route where you wish to add the image.
- From within your Document Builder or Email template, select where within your template you want to embed your image. Then from the WYSIWYG Editor menu, select “Insert” -> “Image“.
- Add the Image
- Use “General” (left-side option) to add a publicly accessible URL to your image, and adjust dimensions in px as needed (pixels; see image below).
- Use “Upload” (left-side option) to add an image from your local computer. Once added, a public URL is created under the “General” tab, where you again can adjust your dimensions in px (pixels; see image below).
- Review your image dimensions, and adjust as needed. If you’ve supplied a valid image/path from step above, the default image dimensions should appear. Note: for the visual editor to display the image, dimensions must be set.
- Click “Save“. Once your image is added, you can drag it to another location as needed, or set the image alignment with the WYSISYG alignment buttons. Right-clicking the image will present you with options to link the image, or revisit the image settings (alt description, dimensions).

ADD DYNAMIC IMAGES WITH DOCUMENT BUILDER
USING THE CODE EDITOR
HTML <IMG TAG METHOD
When using the Code Editor, simply include your img tag, source, and dimensions where you wish to include the image. Then save. Depending on how your sending your payload, you’ll adjust how you’re inserting the image source. IE:
Full URLs in payload:<img src="{$client_logo_url}" width="300" height="300" />
Image filename only:<img src="http://www.yourdomain.com/images/{$client_logo_filename}" width="300" height="300" />
|insert_image MODIFIER METHOD (most flexible)
Using the |insert_image Modifier provides additional flexibility, especially when your images may vary in size. A simple call to insert an image with a fixed image dimensions of 500px width, 400px height looks like this:{$client_logo_url|insert_image:500:400}
However, there are additional parameters you can pass with this tag. You can add max-width and max-height dimensions instead of fixed widths. In the next example, we’ll set a fixed width of 500px, but only a max-height of 400px. While the image width would always be forced to 500px, the height would adjust, up to a maximum of 400px:{$client_logo_url|insert_image:500:0:0:400}
A full breakdown of the this modifier tag looks like this:
| Variable Full URL | Transfomer Tag | width | height | max-width | max-height | ||
|---|---|---|---|---|---|---|---|
{ | $client_logo_url | |insert_image | 500 | 0 | 0 | 400 | } |
To have a an image adjust in size for both width and height, you might instead do this:{$client_logo_url|insert_image:0:0:500:400}
Looping through products, and referring to a separate array of image URLs paired with matching keys as your products array might look something like this:{foreach from=$products item=_product key=_k}…{$product_image_urls[$_k]|insert_image:0:0:500:400}
…{/foreach}
USING THE VISUAL (WYSIWYG) EDITOR
DYNAMIC IMAGE PATH METHOD:
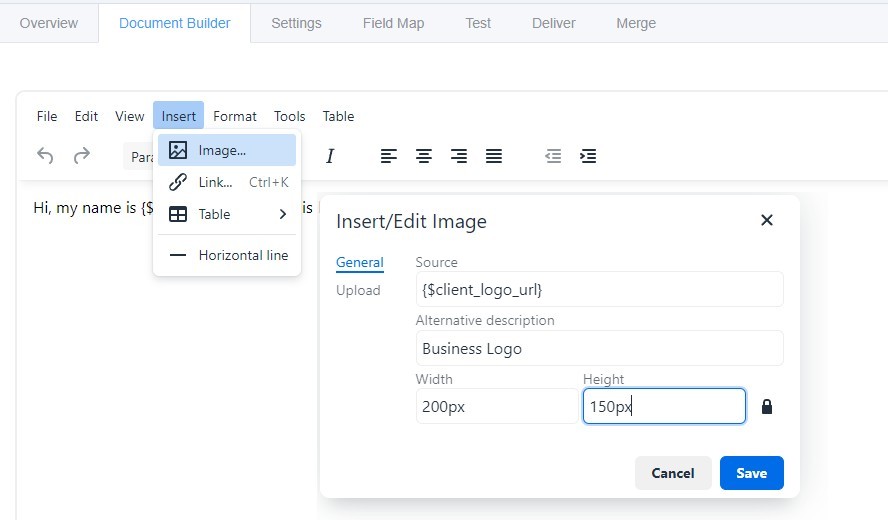
- Load Your Template. Open the Document Builder template from your documents list, or find the email delivery of a document or route where you wish to add the image.
- From within your Document Builder or Email template, select where within your template you want to embed your image. Then from the WYSIWYG Editor menu, select “Insert” -> “Image“.
- Using the default “General” option, add the image path in the “Source” field using your $variable containing full URL(s) or partial URL paths or filenames. Your dynamic paths might look something like this:
- Source:
{$client_logo_url} - Source:
https://site.com/images/{$client_name}/logo.jpg - Source:
https://site.com/images/client_logos/{$client_logo_filename}
- Source:
- Set your static width and height dimensions. Failure to do so will not render a visible image placeholder in the visual editor. In such cases, you can switch to the Code Editor after saving to view the embedded <img tag.
- Click “Save“. Because this isn’t a readable path in the WYSIWYG/Visual editor, no image will load but a placeholder will still be visible. You can drag it to another location as needed, or set the image alignment with the WYSISYG alignment buttons. Right-clicking the image will present you with options to link the image, or revisit the image settings (alt description, dimensions).
DYNAMIC IMAGE |insert_image TRANSFOMRER METHOD (most flexible)
Using the |insert_image Modifier provides additional flexibility, especially when your images may vary in size. A simple call to insert an image with a fixed image dimensions of 500px width, 400px height looks like this:{$client_logo_url|insert_image:500:400}
However, there are additional parameters you can pass with this tag. You can add max-width and max-height dimensions instead of fixed widths. In the next example, we’ll set a fixed width of 500px, but only a max-height of 400px. While the image width would always be forced to 500px, the height would adjust, up to a maximum of 400px:{$client_logo_url|insert_image:500:0:0:400}
A full breakdown of the this modifier tag looks like this:
| Variable Full URL | Transfomer Tag | width | height | max-width | max-height | ||
|---|---|---|---|---|---|---|---|
{ | $client_logo_url | |insert_image | 500 | 0 | 0 | 400 | } |
To have a an image adjust in size for both width and height, you might instead do this:{$client_logo_url|insert_image:0:0:500:400}
Looping through products, and referring to a separate array of image URLs paired with matching keys as your products array might look something like this:{foreach from=$products item=_product key=_k}…{$product_image_urls[$_k]|insert_image:0:0:500:400}
…{/foreach}
- Load Your Template. Open the Document Builder template from your documents list, or find the email delivery of a document or route where you wish to add the image.
- From within your Document Builder or Email template, select where within your template you want to embed your image.
- Add your full dynamic image path $variable using the |insert_image Modifier, specifying your image dimensions.
{$client_logo_url|insert_image:0:0:500:400}
- Click “Save“.